Sonichris

Joined: Mar 06, 2006
Posts: 1911
Wear gloves - I'm in the Rockies


|

Posted on Oct 18 2017 09:29 PM
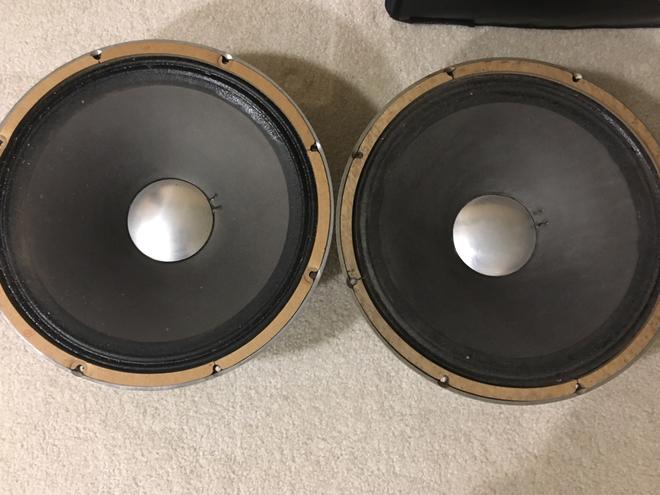
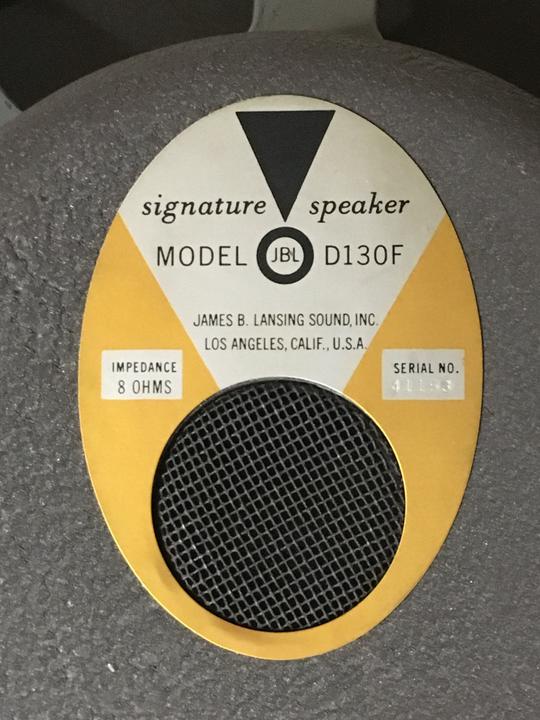
With all the 15" speaker talk, I thought we might need a place to talk about everyone's favorite 15" speaker, the JBL D130F  Maybe not everyone's favorite, but a common one, and thee speaker in the day. Maybe not everyone's favorite, but a common one, and thee speaker in the day.
Anyway, I found these two today on Craigslist. Original cones, seemingly good condition. The one on the right has a small 1/4" repair that looks well done. I hooked them both up outside a cabinet, and both sounded excellent, considering. I'll stick them in a cabinet and give them more of a test later.
What should I look for, or other prospective buyers look for when buying speakers that are 40-50 years old? I thought I knew what to look at, until I arrived at the dudes house, and I stood there and stared at them like a moron.
— "You can't tell where you're going if you don't know where you've been"
|
Badger

Joined: Nov 16, 2013
Posts: 4537
Wisconsin

|
Posted on Oct 18 2017 10:10 PM
Tagged, great questions Chris. And congrats - that stuff never seems to happen on cl around here. 
— Wes
SoCal ex-pat with a snow shovel
DISCLAIMER: The above is opinion/suggestion only & should not be used for mission planning/navigation, tweaking of instruments, beverage selection, or wardrobe choices.
|
tubeswell

Joined: Sep 24, 2011
Posts: 1424
Wellington, NZ

|
Posted on Oct 19 2017 12:22 AM
Sonichris wrote:
What should I look for, or other prospective buyers look for when buying speakers that are 40-50 years old?
With anything 2nd-hand you take your chances, but:
Measure the coil (across the speakers terminals)with your ohmmeter to ensure that there is the ballpark DC resistance on the coil. (It will measure slightly below the stated impedance, (so an 8R speaker may measure 5 to 6 R. etc That is fine. If there is no reading, the coil is open and will have to be replaced.
The other thing to check is whether there is any voice coil rub anaginst the magnet pole piece, which you can do by slowly, carefully and gently pushing the cone in and out (but don't push/press on the dome in the centre). The cone should move freely. If the coil is rubbing you will feel (and hear) the scraping.
The other thing to check (obviously) is for visible damage/tears to the cone and/or spider.
— He who dies with the most tubes... wins
Surf Daddies
|
eddiekatcher

Joined: Mar 14, 2006
Posts: 2779
Atlanta, GA


|
Posted on Oct 19 2017 09:18 AM
I agree on Tube's speaker checks. I would add however that with JBL's and especially the early ones before they opened up the voice coil clearance, that one must take special care when checking the cone movement for voice coil rubbing by very carefully applying a light even pressure to opposite sides of the cone when moving it in and out. It doesn't take much in the way of uneven pressure to "force the coil out of alignment" and have it start rubbing in the slot, which may give you a false bad speaker reading. I try to spread out my fingers in a fan shape and apply even pressure to as wide a area of the cone as possible. The key here is less is more.
Additionally when checking the coil for continuity, a good practice it to hook up the volt/ohm meter and carefully wiggle the flying leads leading out from the terminals to the voice coil when checking the coil's resistance. JBL's and Peavey Black Widows will sometime become intermittent in continuity where the flying leads are soldered to the voice coil tie points. This often times shows up with the flying lead check.
When possible, hook it up and very carefully listen to it. Don't expect it to sound like you would if it is correctly mounted in a cabinet. And don't push it too hard.
If you are buying one rebuilt at a speaker re-coning station, have them demonstrate it's performance to you with their signal generator.
Good speaker hunting! Literally.
Cheers,
ed
— Traditional........speak softly and play through a big blonde amp. Did I mention that I still like big blonde amps?
|
Sonichris
Joined: Mar 06, 2006
Posts: 1911
Wear gloves - I'm in the Rockies
|
Posted on Oct 19 2017 07:30 PM
Great info!
As it turns out, the one on the right is no good. Scraping sounds abound. When playing thru it, it has a bad resonating ring on sustained notes. Is that the voice coil rubbing?
Ive read that re-coned JBL's don't sound like they did originally? Is that true?
— "You can't tell where you're going if you don't know where you've been"
|
tubeswell
Joined: Sep 24, 2011
Posts: 1424
Wellington, NZ
|
Posted on Oct 19 2017 07:44 PM
Sonichris wrote:
Ive read that re-coned JBL's don't sound like they did originally? Is that true?
Depends who does the re-cone work and whether they are using 'original' spec materials (cone, spider, etc)
— He who dies with the most tubes... wins
Surf Daddies
|
reventlos

Joined: May 23, 2006
Posts: 209
Costa Mesa

|
Posted on Oct 19 2017 08:31 PM
Depends who does the re-cone work and whether they are using 'original' spec materials (cone, spider, etc)
I have one original cone D-130 left, which resides proudly in my tone ring cab. It really does sound amazing, and I agree that reconed D-130's from the past just don't have the same mojo. (Most of the old factory kits used E-series parts). Does anyone have any experience with the kits currently being offered that claim to be authentic repro's of the orig cones?
|
tubeswell
Joined: Sep 24, 2011
Posts: 1424
Wellington, NZ
|
Posted on Oct 19 2017 08:45 PM
Weber re-cone parts are pretty legit and I've used them myself. It all comes down to how skilfully you manage the task and don't heap too much epoxy on the seams etc. Its cheap enough that its worth a shot just to increase your repertoire of DIY skills. Tools required are minimal. There's plenty of 'how-to' videos on Youtube, like this one
Email Brian Spane (Brian@tedweber.com) to get a list of the recommended parts for your exact JBL re-cone job, and then order it on-line. (Order enough parts for 2 or 3 kits together, in case you fluff up the 1st attempt)
— He who dies with the most tubes... wins
Surf Daddies
|
eddiekatcher
Joined: Mar 14, 2006
Posts: 2779
Atlanta, GA
|
Posted on Oct 19 2017 09:50 PM
Ooooh sorry Chris,
Yep, and yep.
Here's what the JBL service department told me about 20 years back when we first got into the blonde cabinet and amp deal:
I bought a 2-15 Showman cabinet knowing that it had 2 blown D-130's in it. I called Northwest Speaker here in Atlanta and was told that they could re-cone the speakers "good as new" with really accurate aftermarket parts. Not too sure of that, I called JBL. I was told that they could not quote me on the repairs over the phone and I'd have to ship the two bad speakers to LA and they would check 'em out and then give me a quote. So I did.
About a week or so later I get a call from JBL. My two original D-130's cannot be repaired without modifying the speaker frames and magnet assemblies as the original parts were NLA, and hadn't been for years. Now, for the paltry sum of $250 per speaker, they would de-mag the magnets, disassemble my speakers, machine the coil gap from .056" to .083" clean up the mess re-mag the magnets, and re-cone them with E-series (as in E-130) parts, box 'em up and ship 'em back, oh and I'd get to pay the freight........
About two seconds later, I responded that I thought $500 to re-cone two speakers, which had failed in service due to a faulty original design, and that they knowingly had discontinued stocking parts to repair the original design was extortion. On a roll, I continued on that if they had any integrity, they would just chuck them back in my original boxes and and return them to me pre-paid. "I'd use them for boat anchors." So....
They shipped them back and both are still in the boxes, in the basement where they remain untouched.
Am I still pissed? Nah. Later on, I actually had two other ones re-coned with the "super duper better than stock" aftermarket parts by Northwest Speaker. Like Matt sez, they just don't quite have it. I don't think I've ever played a show with that cabinet. Woody likes it for rhythm guitar.
That's my story and I'm stickin' with it. Oh, and I think there are at least five dead 12 and 15 inch JBL's down there in the Boatwerx. (Dead EV's, zero).
Cheers!
ed
— Traditional........speak softly and play through a big blonde amp. Did I mention that I still like big blonde amps?
|
tubeswell
Joined: Sep 24, 2011
Posts: 1424
Wellington, NZ
|
Posted on Oct 19 2017 10:58 PM
Well its either you fixing it or someone else fixing it. The speaker will just sit there as junk otherwise.
— He who dies with the most tubes... wins
Surf Daddies
|
JObeast

Joined: Jul 24, 2012
Posts: 2762
Finknabad, Squinkistan

|
Posted on Oct 20 2017 12:56 AM
I lucked out on cl in Cook Co.,IL back in ‘15 finding a high end audio fanatic selling a pair of D130s (not Fs) for $150 ($75 ea.), original cones. One cone has some small repairs so it’s not visibly ‘perfect’ but both sound just great where I installed them in a huge drip edge Bassman cab I also picked up in Chicago that year. The rig I put together with a SF Twin Reverb Head is so hifi and loud it’s almost audiophile. I played recorded music through it for most of the year, when I wasn’t blasting surf guitar on it. Also works great for bass guitar and Fender Bass VI. To my ear the D130 is a unimpeachable.
— Squink Out!
Last edited: Oct 20, 2017 00:57:12
|
Sonichris
Joined: Mar 06, 2006
Posts: 1911
Wear gloves - I'm in the Rockies
|
Posted on Oct 20 2017 11:13 AM
tubeswell wrote:
Weber re-cone parts are pretty legit and I've used them myself. It all comes down to how skilfully you manage the task and don't heap too much epoxy on the seams etc. Its cheap enough that its worth a shot just to increase your repertoire of DIY skills. Tools required are minimal. There's plenty of 'how-to' videos on Youtube, like this one
Email Brian Spane (Brian@tedweber.com) to get a list of the recommended parts for your exact JBL re-cone job, and then order it on-line. (Order enough parts for 2 or 3 kits together, in case you fluff up the 1st attempt)
Great links! The weber re-cone parts list is very interesting! One thing they mention on the JBL cone is a cloth surround, which I have read is not the same as the paper surround with the black rubbery goop used by JBL. The cloth is a later E type surround, or so I've read.
I've actually used this kit: Sound speaker jbl kit a long time ago. It was easy to install, and it looked nice, but I convinced myself that the speakers didn't sound the same, and sold them. the surround is paper, but no goop.
I saw this kit on Reverb: Reverb JBL Kit Cloth paper with goop.
I can buy the rubbery goop (re-zon Ex) separately. I wonder if Weber has a substitute cone recommendation. Just thinking out loud. I'll email them and see.
Since I'm "frugal", I'd really like to get the parts from Weber and try it, rather than spend double the $ on a pre-assembled kit. All the parts from Weber add up to $40.
I've also got a set of Oxford 12" that need re-cones - I could practice on them for very little money, and get good at it before I do the JBL.
— "You can't tell where you're going if you don't know where you've been"
Last edited: Oct 20, 2017 11:58:12
|
JObeast
Joined: Jul 24, 2012
Posts: 2762
Finknabad, Squinkistan
|
Posted on Oct 20 2017 11:58 AM
Didn’t Ran above share the opinion of the speaker designer himself that the surround doesn’t much affect the performance of the speaker but is just more UV proof than the goop on the earlier model?
— Squink Out!
|
Sonichris
Joined: Mar 06, 2006
Posts: 1911
Wear gloves - I'm in the Rockies
|
Posted on Oct 20 2017 12:41 PM
JObeast wrote:
Didn’t Ran above share the opinion of the speaker designer himself that the surround doesn’t much affect the performance of the speaker but is just more UV proof than the goop on the earlier model?
The way I understand it is the goop was the fix for outdoor/high temp use.
Harvey Gerst was the guy that designed the JBL D series speakers, and re-designed the D130 to d130f specs. Here's a good thread on the Sunn forum where harvey himself gives some insight. Sunn JBL thread
I think Harvey Gerst stopped working for JBL in the later 60's, before the E and K series speakers came around. It sounds like the cloth surround came to be later in the K series speakers. My thoughts are if the later series speakers don't sound the same as the earlier ones, then the small differences in construction must add up to more than the sum of their parts. Or maybe I'm just geeking out too hard, which is entirely possible! 
— "You can't tell where you're going if you don't know where you've been"
Last edited: Oct 20, 2017 12:44:28
|
tubeswell
Joined: Sep 24, 2011
Posts: 1424
Wellington, NZ
|
Posted on Oct 20 2017 06:23 PM
Sonichris wrote:
Great links! The weber re-cone parts list is very interesting! One thing they mention on the JBL cone is a cloth surround, which I have read is not the same as the paper surround with the black rubbery goop used by JBL. The cloth is a later E type surround, or so I've read.
Indeed. However, I know from past ordering experience that they don't always have the complete list of available parts on their re-cone parts page (because there are so many different variations. Email Brian to see if they have the D-series 130F cones. He can amend their re-cone parts page to provide extra links for ordering specific parts that aren't there.Their Californa 15s have a paper surround IIRC, so they must stock the cones.
— He who dies with the most tubes... wins
Surf Daddies
Last edited: Oct 20, 2017 18:28:00
|
Sonichris
Joined: Mar 06, 2006
Posts: 1911
Wear gloves - I'm in the Rockies
|
Posted on Oct 20 2017 07:22 PM
Brian got back to me very very quickly. Thanks for the lead, tubeswell!
It turns out, after an email, they do carry an all paper surround that can be cut down for D130 speakers! All the specs make it sound like just the thing to do a proper re-cone. From what I've been reading, all paper, and light weight are the hot setup. One of the big differences between the D130F and the D140F is the smooth vs. ribbed cone. Ribbed cone is heavier, and contributes to the durability, but cuts down on high end "pop".
I may be chasing ghosts here, but it's been fun learning more about speakers, and how they work in the last few days. Now that I have a good JBL, (actually 2) I can do a re-cone, and see if, at least to my ears, the re-cone matches the originals.
Hopefully, someone else will find all this helpful in the future too.
— "You can't tell where you're going if you don't know where you've been"
|
tubeswell
Joined: Sep 24, 2011
Posts: 1424
Wellington, NZ
|
Posted on Oct 20 2017 08:01 PM
Awesome. Have fun. I suggest you get a double of everything in case the beginning attempt doesn't work out. 's what I did 1st time around. Learning to re-cone speakers is a really practical skill and immensely satisfying. Its not hard once you get the gist of it.
A tip for getting the coil evenly-spaced round the pole piece gap is to make a shim out of a piece of typewriter paper cut into a long strip that can go several times around the circumference of the pole piece gap (like in that 'Uncle Doug' video). The gap in these vintage speakers is somewhat narrower than more modern versions, which is what gives these speakers their efficiency, so its important to get the gap as even as you can for a good re-cone, as there isn't much room for error. The other thing is don't over-goop when you epoxy the spider to the coil. You only want a thin even bead of glue right at the perimeter of the hole in the spider to ensure the spider retains maximum flex. (This takes a patient and steady hand, so ensure you have something at the right height to rest your elbow on)
Also, when you cut the old cone and spider out, cut around the outer perimeter of the cone and the inner perimeter of the cone (where it joins onto the voice coil) to remove the bulk of the cone first. Then you will see the spider better. Then cut around the edge of the spider near the outer perimeter with a sharp xacto blade. Don't try and scrape the spider off the basket at this stage (that comes later). The coil (along with most of the spider) should lift out once you clip away the old tinsel wire leads. Then, before you start scraping anything, cover the pole piece gap thoroughly over with masking tape (to avoid getting any particles inside the gap once to start scraping off the remanent of the spider and cone etc from the basket). You want to get all gluing surfaces perfectly clean and flat, and using a bit of coarse grit and then fine grit sandpaper is a good way to proceed (once you have finished with the scraper). Doesn't matter if you chip some paint off and go right back to the bare metal when doing this. You can always sand and touch that up with a bit of paint if you want. It really helps to keep the gap taped up during this time to avoid surplus crap getting into it. Vacuum the basket throughly before removing the tape. Then vacuum inside the gap and use the card-backed tape trick to clean out any stuff that might happen to be in the gap. You don't want anything inside the gap.
— He who dies with the most tubes... wins
Surf Daddies
Last edited: Oct 20, 2017 22:43:28
|
tubeswell
Joined: Sep 24, 2011
Posts: 1424
Wellington, NZ
|
Posted on Oct 20 2017 08:38 PM
From the weber site, the parts you will need for each re-cone are:
Coil
Spider
Cone
Gasket set (you might as well have this because you'll destroy the old gasket in removing it)
dust cover dome
tinsel wire for the flying leads (2 x lengths are needed for a 15" speaker)
Ensure you have everything trimmed and dry-fit everything first before doing any gluing to make sure that everything is resting flat with no pressure or warping.
For the adhesives I use:
1) Fast drying superglue for bonding the spider perimeter to the basket frame. You need to apply a bead to both surfaces and then get the spider in place quickly (once you have the coil former centred properly over the gap with the correct shimming all around the gap).
2) Ados F2 for bonding the cone outer perimeter to the basket and for bonding the gasket over the top of this
3) 5 minute epoxy for bonding the spider (and then the cone) to the coil former and for bonding the coil leads to the cone afterward
4) fast drying all purpose glue (I use Weldbond adhesive) for bonding the dust cover to the cone.
— He who dies with the most tubes... wins
Surf Daddies
|
tubeswell
Joined: Sep 24, 2011
Posts: 1424
Wellington, NZ
|
Posted on Oct 20 2017 08:53 PM
The work order is
1) removal of the old cone
2) removal of the spider and coil
3) masking tape over the pole piece gap
4) scraping and sanding all contact surfaces of the basket flat. and vacuuming everything, then thoroughly cleaning out the pole piece gap.
5) dry fitting and 'trimming' everything incrementally. (Don't over trim) including aligning the coil in the pole piece gap with the correct shimming. You can rub your thumbnail around the inner gap in the cone to incrementally burr it out to the appropriate diameter so it fits over the coil former and spider evenly without any pressure. Its better to trim parts a little bit at a time and fit incrementally, rather than trying to trim too much off all at once. The better you can get the parts fitting without any pressure twisting or warping, the better the result.
6) remove all parts and align the coil former to the correct height and spacing in the pole piece gap with the shim. The shim should be wrapped into a cylindrical shape that fits squarely into the gap between the coil former and the pole piece gap. The shim should be able to slide in and out evenly. Don't get the shim crooked, or the resulting gap won't be even. When cutting the shim its best to try and make it a perfect rectangular shape, so that when you roll it into a cylinder, it easily squares up. The shim rectangle should be long enough to go around the pole piece perimeter several times leaving a hair short of 2 or 3 times the exact circumferential length. The number of rolls of this paper will need to be adjusted - usually 2 or 3 circumference lengths - to make sure the shim is snug, but not so tight that it can't be removed when the gluing is finished. The depth of this cylindrical shim should be about 1" deeper than the coil former. Make sure the coil leads line up with the terminals on the basket, and make sure the coil former is positioned depth-wise into the pole piece gap so that there is enough clearance between the bottom of the former and the back of the speaker magnet so that the former won't knock into the back of the magnet when the cone is in maximum incursion, but deep enough so the the former doesn't pop right out of the gap when the cone is in maximum excursion.
7) superglue the spider perimeter to the basket ensuring it is centred evenly around the coil former (some Weber coils and spiders are designed to match without trimming, but this cannot be guaranteed. Where these pieces match, the spider will fit snugly over the former, and then its a matter of ensuring the coil is shimmed properly around the pole-piece gap before gluing anything).
 epoxy the spider to the coil former with a thin even bead of epoxy. Don't get any epoxy on the shim otherwise you'll feck everything up. epoxy the spider to the coil former with a thin even bead of epoxy. Don't get any epoxy on the shim otherwise you'll feck everything up.
9) pierce 2 small holes in the cone for the tinsel wire leads (using a largish sharp sewing needle). Don't make these holes too big. They should only be barely big enough for the tinsel wire to pass through.
10) use a small dab of epoxy to hold each tinsel lead onto the back of the cone.
11) adhere the cone perimeter to the basket perimeter, ensuring the cone is centred evenly around the coil former and the tinsel leads are lined up with the coil leads/basket terminals.
12) adhere and clamp the gasket over the top of the cone perimeter ensuring the gasket spaces line up with the bolt holes
13) epoxy the centre of the cone to the coil former with the thin even bead of epoxy. Avoid getting any epoxy on the shim.
14) attach each of the coil leads to the ends of the tinsel leads inside the cone and electrically secure these connections a small dab of solder with a fine pointed soldering iron
15) epoxy each coil lead onto the cone surface with a thin bead of epoxy
16) remove the shim only when everything is totally dry
17) glue the dust cover to the cone ensuring it is aligned over the coil
18) solder the tinsel wire leads to the basket terminals and test the speaker
— He who dies with the most tubes... wins
Surf Daddies
Last edited: Oct 20, 2017 22:40:52
|
tubeswell
Joined: Sep 24, 2011
Posts: 1424
Wellington, NZ
|
Posted on Oct 21 2017 12:11 AM
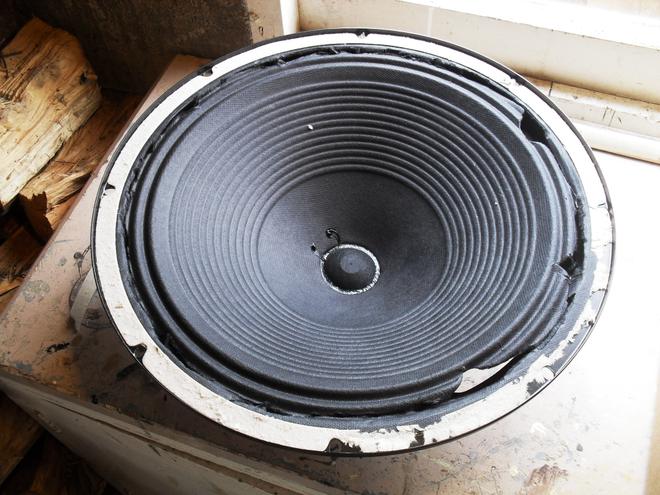
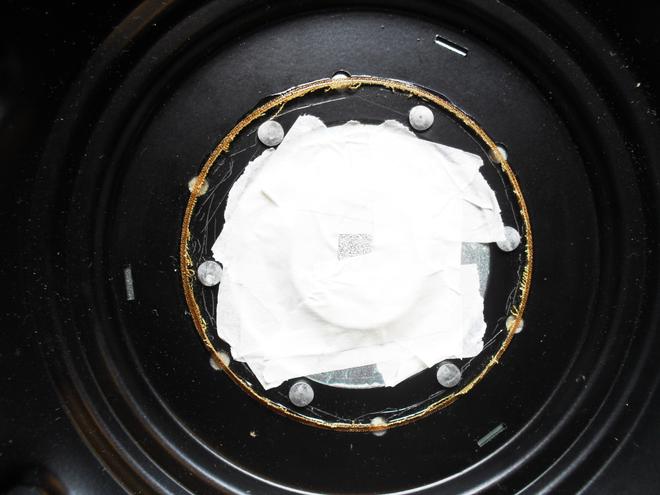
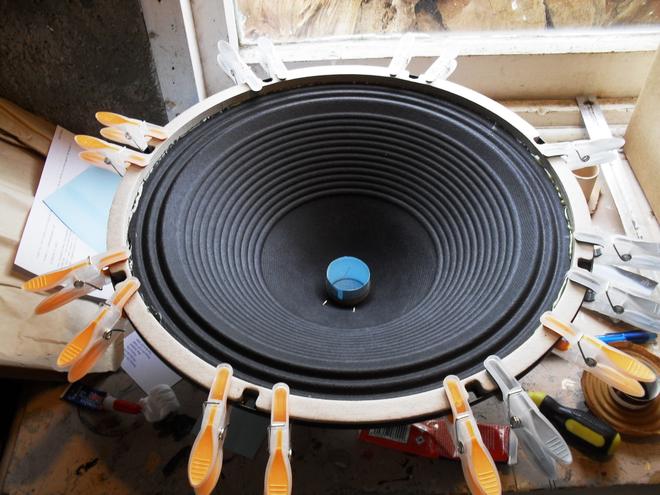
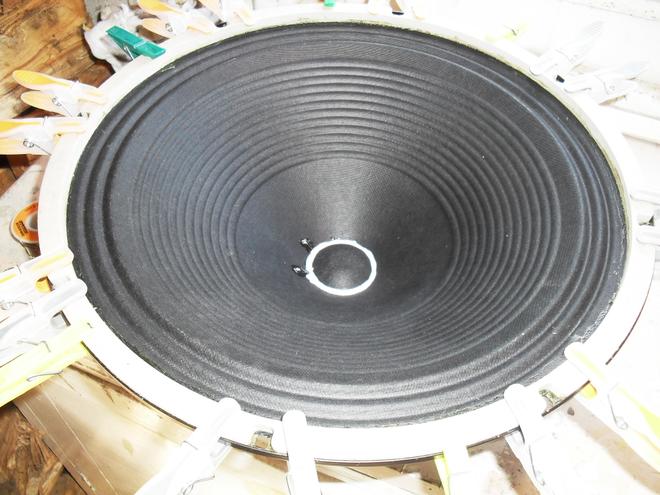
Here's a couple of photos showing the various stages I mentioned above
Removing the cone and spider exposing the pole piece and masking it before scraping and cleaning
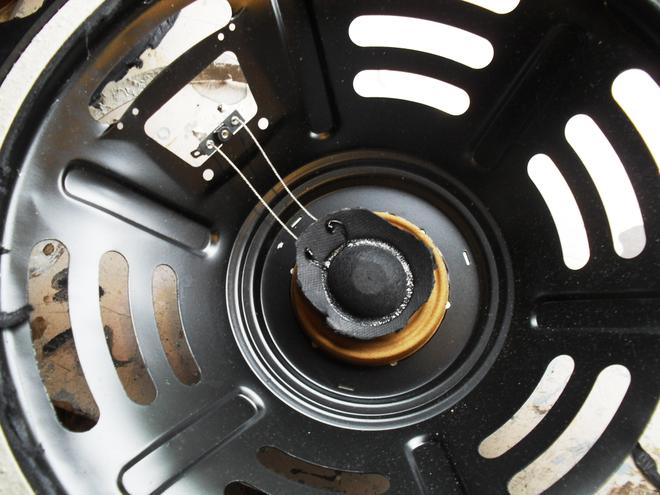

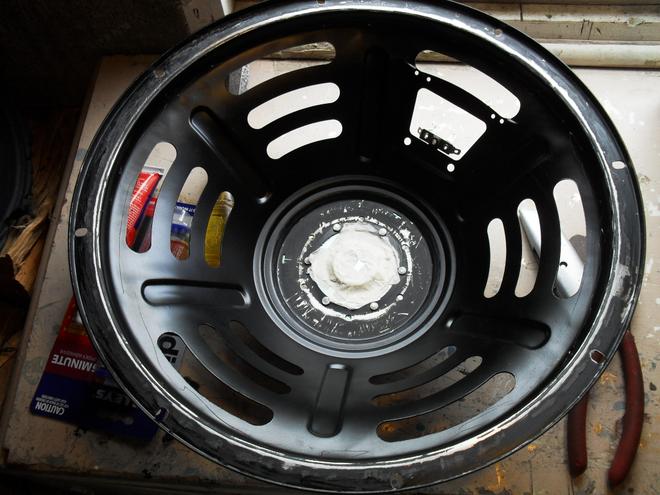
Dry fitting the spider and coil former and dry fitting the shim

new cone and gasket glued on - showing shim
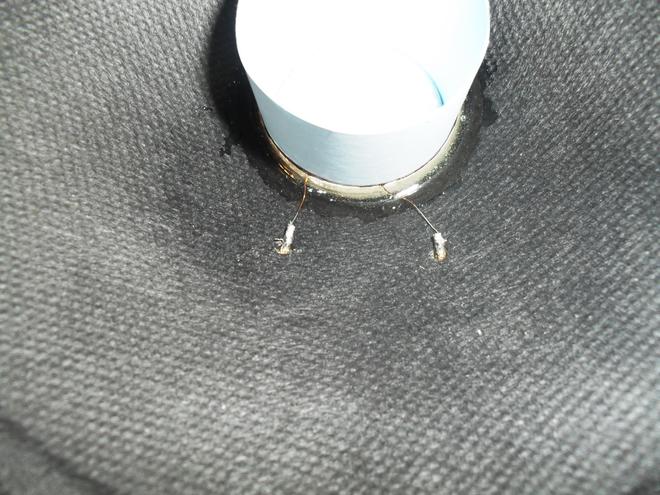
Final touch
— He who dies with the most tubes... wins
Surf Daddies
|


